Shortcrust Pastry
How to make, roll and bake shortcrust pastry for perfect pies and tarts.
Introduction
Pastry comes in many different forms, all are made with flour and liquid, most contain some kind of fat.
Pastry has evolved through the centuries from Roman times. Originally it was a basic flour and water dough, wrapped around a piece of meat to seal in the juices and aromas while being roasted. It was never intended to be eaten, but through time and the addition of other ingredients, pastry has become not only a casing to hold together savoury or sweet pies and tarts, but also to complement their flavours and textures.
The most popular and versatile pastry is shortcrust and recipes can be wide and varied depending on the degree of crumbly crispness (or shortness) needed for a particular dish. Pastry texture also depends on the ratio of fat to flour and the amount of handling the pastry is given before baking.
The following lessons take you step by step through the pastry making process, explaining what ingredients are the best to use, the best techniques for a great result and lots of hints and tips to help you shine with perfect pastry pride!
By the end of this pastry course you will be able to make and bake short crust pastry with confidence.
- Know which flour, fats and liquids to use.
- How to mix pastry by hand, in a food processor and stand mixer.
- Why you should rest pastry and for how long.
- How to roll and pick up finished pastry.
- How to line a flan dish and make a cartouche.
- How to bake blind, what oven temperatures to use.
So why would you bother to make your own pastry when you could just buy some ready made and ready rolled, or even a ready baked pastry case??
True, there are ready made pastries out there, some are better than others, however if you can make your own, it will be far superior in terms of flavour and texture. You will also know what ingredients have been used and ingredient cost will be less. Apart from everything else, being able to make pastry is a skill to be proud of.
The best way to complete this course
Read it through first of all and watch the videos. Take a look at the recipe suggestions at the end of the course and decide which one(s) you’re going to make. Buy the ingredients if necessary, come back to the beginning and follow the instructions step by step.
What you need to complete this course
A bowl, table knife, rolling pin and flan dish. Cling film, non-stick baking parchment or grease proof paper and of course, an oven. Ingredients to make at least one of the recipes at the end.
Lesson 1 – Ingredients
Pastry ingredients are not expensive, they are readily available everyday staples.
Flour
Normally plain or all purpose flour is used. It gives a crumbly, crisp pastry that can be rolled quite thinly.
Wholemeal flour gives a nutty flavour to pastry but on it’s own will make a heavy pastry. Use it mixed half and half with plain flour to lighten the texture.
Self-raising flour is used to give a more ‘cakey’ texture and is good used with fruit pies. The addition of a little SR flour also lightens heavier pastry like suet or cheese pastries.
Fats
Standard shortcrust pastry contains 1/2 quantity fat to flour.
Any solid fat can be used depending on the flavour and strength of pastry you’re after.
Block butter gives the richest pastry with a buttery flavour.
Lard gives strength, but lacks flavour.
Other fats that can be used are margarine, vegetable shortening and coconut oil. Always try and use solid fats rather than ‘spreadable’ fats to make pastry.
This is because
- The ‘spreadable’ fats won’t harden sufficiently while the pastry is resting, making it harder to roll and handle without cracking.
- The fat within the pastry will melt at a lower temperature, risking the pastry melting before it has a chance to set during the cooking process.
- If the room is warm and/or your hands are hot, the fat in the pastry will melt more quickly, making it harder to roll and handle as you work it.
If your making pastry by hand, have the fat at room temperature, this allows you to rub the fat into the flour as quickly as possible to avoid over handling.
If you’re making pastry in a food processor, use the fat straight from the fridge. As the blade will cut the fat into the flour very quickly.
Your aim is to keep the pastry as cool as possible and to work as quickly as possible to achieve the best possible texture in the finished pastry.
Liquids
Shortcrust pastry should contain as little liquid as possible, only enough to bind everything together. It should also be as cold as possible to keep the temperature of the pastry down, helping to keep the fat from softening as you work the pastry.
- Water gives a crispness to the pastry.
- Egg white also gives crispness.
- Egg yolk will make beautifully rich pastry which can be difficult to roll. It’s often a good idea to whisk a little water into egg yolks to enable easier rolling. You could also use the whole egg.
- You may come across recipes that use milk, cream or other liquids to bind.
Pastry which is too wet will tend to shrink a lot and become tough when cooked.
Lesson 2 – Mixing
Shortcrust pastry needs to be mixed quickly and gently to avoid it going tough. Here are two methods, by hand and in a food processor.
Making pastry by hand
- Use a large bowl so that you have plenty room to work.
- Tip the flour into the bowl and add the fat. If it’s in a whole piece, toss in the flour as you pull it into smaller chunks. You could also cut the fat with a knife before adding to the flour.
- Use your finger tips to gently and quickly rub the flour into the fat. Do this by picking up the fat and flour, holding it above the bowl and use your thumbs to rub across your finger tips allowing the fat and flour to fall back into the bowl. Keep repeating until the fat and flour are combined.
- The flour and fat mixture should not be in your hands long enough for it to start to melt, the mixture should not become warm and sticky.
- Once the mixture resembles bread crumbs, it’s time to add the liquid a little at a time until the mixture comes together to make a dough. Use a table knife to mix and cut through the mixture to bring it together, this cuts down the amount of handling for a shorter, more crumbly pastry.
- Squash the lumps of dough together, form into a flat disk, cover and refridgerate for about 20 mins before using the pastry.
- DO NOT BE TEMPTED TO KNEAD THE PASTRY, this will make it tough. If there are streaks, these will disappear as the pastry is rolled.
- The refridgeration stage once the pastry is made is important as it lets the gluten in the flour relax and the fat firm up, making the pastry easier to roll and handle, reducing shrinkage and giving a more crumbly texture.
The video below shows a close up of the rubbing in process
Watch this video to see the whole process, start to finish.
Watch the video below to see pastry being made in a food processor.
Making pastry in a food processor
- Using a food processor gives a very good result and takes seconds to make. This is because the blade of the processor is cutting through the ingredients to combine them rather than mixing which works the gluten in the flour.
- Put the flour and fat into the bowl of the processor, whiz to crumbs and stop the machine.
- Add the liquid to the mixture and whiz again until the mixture forms lumps. Stop the machine as soon as the motor changes pitch, tip the dough onto your surface and press together into a flat disk.
- Do not knead to make a smooth dough, rolling the pastry will do this. Wrap and chill for at least 20 mins.
Making pastry in a stand mixer
- Use the ‘K’ beater and blend the butter into the flour on a low speed.
- Add the liquid and blend again on a low speed until the pastry comes together.
- Form into a flat disk, wrap and chill as before.
Lesson 3 – Rolling Pastry and Lining a Flan Dish
Now that our pastry has rested and firmed up, it’s time to roll it out.
A lot of people find rolling difficult, they end up with the pastry too thick or too thin, often it is thicker in the middle and thinner around the edges.
This next video shows you how to roll out your pastry and line a flan dish.
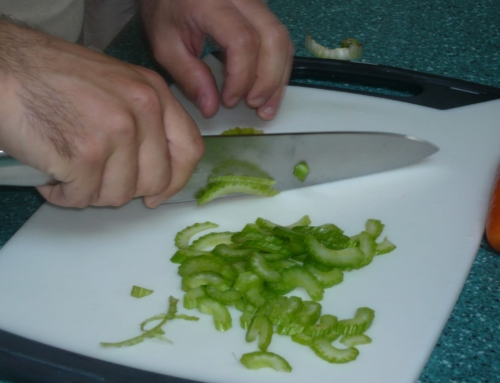
It’s important to roll the pastry evenly and thinly. Remember that the pastry is there to hold the filling in place and compliment it, but not be the main ingredient.
- Start with a light dusting of flour over and under the pastry. Avoid putting too much flour on your surface, as you will alter the flour to fat ratio and end up with something that is dry and difficult to work.
- Use short, firm, but gentle strokes, back and forward over the middle of the pastry, turning it around a little every couple of strokes to create an even shape.
- When you turn the pastry, lift it up a little and move it over the floury surface, this re-distributes the flour under the pastry and helps prevent it sticking.
- Roll out the pastry a little larger than your dish or ring. This will ensure there is enough pastry to line the sides of the dish.
- Pick up the rolled pastry by putting the rolling pin on the bottom half of the pastry and lifting the top edge over the pin. You can now lift the pastry up and drape it over your flan dish.
- Ease the pastry into the bottom of the dish by lifting up the free edge and pressing it into the corners with your finger tips.
- Now you need to make a neat edge – do this by going around the pastry at the top of the dish. Bend your finger into a hook shape and use the flat side to press gently around the edge. At the same time, with your other hand, use a finger or thumb to push the edge onto it. This will create a small lip all around the edge of the pastry.
- Use the rolling pin to roll back and front, side to side over the edge of the pastry to cut off the excess.
- Now go around the lip and ease it up so that it protrudes a little over the edge of the dish. Shortcrust pastry always shrinks a little when cooked, creating this small edge compensates for shrinkage and makes a neat edge.
- You’re now ready to bake!
Re-rolling Pastry
Ideally you want to roll your pastry only once. The more it is rolled, the tougher it gets and the more it will shrink when baked. There are always scraps however and I hate to see them thrown away.
If I’m making small pies eg mince pies, I will roll out some of my batch of pastry, then mix the scraps with some more of the unrolled pastry dough, approximately 1/2 fresh pastry and 1/2 scraps.
Pastry also freezes well, but is easier to roll when freshly made. I make a big batch of pastry and line as many flan dishes as I can, layer them up with cling film or grease proof paper in between and freeze. I then have a ready to bake pastry case whenever I feel the need to use it.
Top Tips for Rolling Pastry
- To prevent thin edges, roll over the middle of the pastry, but not the edges nearest or furthest away. These edges will roll out as you turn the pastry round.
- To roll the pastry into a circle, think of the numbers around a clock face. As you move the pastry round, imagine you are starting at 12 and moving round each number. This should result in a round shape. Move the pastry every quarter to make a square.
- Be decisive with the pastry, the more you fiddle with it, the warmer and greasier it will become, resulting in tough pastry.
- Rolling the pastry too large will create folds, resulting in an uneven finish. The pastry will also be difficult to handle.
- If your pastry becomes too soft and greasy or starts to shrink back when rolling, you have handled it too much. Put it back in the fridge to rest or start again.
Tears and gaps in pastry can be easily repaired. Watch the video below to see how to do it.
Lesson 4 – Baking Blind
Baking blind is when pastry is half cooked before adding the filling. It ensures that the bottom of the pastry is cooked, rather than staying raw and soggy.
Make sure to have your oven pre-heated to 200C/400F/Gas6 for plain pastry. This sets and cooks the pastry quickly before it melts.
If you’re cooking sweet pastry, the more sugar it contains, the more quickly it will burn. Start with 10 minutes at 200C, then turn the oven down to 180C/350F/Gas4 for the remainder of the time.
- Cut a piece of non stick baking parchment or grease proof paper slightly bigger than you dish. Put it into the pastry case and fill with baking beans.
- Having the paper slightly bigger than the dish ensures there is enough paper to make the removal of the beans easy.
- Baking beans can be anything from dried beans, rice, ceramic balls, pebbles or coins. Keep them in a labelled container, separate from other food stuffs and re-use them again and again.
- Put into the oven and bake for about 15 mins. The pastry edge around the top of the dish should be just turning golden. Remove the beans and put the dish back into the oven for another 5 minutes to finish cooking the base.
Now it’s time to practice what you’ve learnt. Start by picking one of the savoury recipes, make a batch of pastry and get rolling!
Click on the heading links to access a downloadable recipe.
5 Shortcrust Pastry Recipes
Choose your pastry and make up your own filling

Broccoli, Herb & Feta Quiche
A modern twist on a traditional classic.

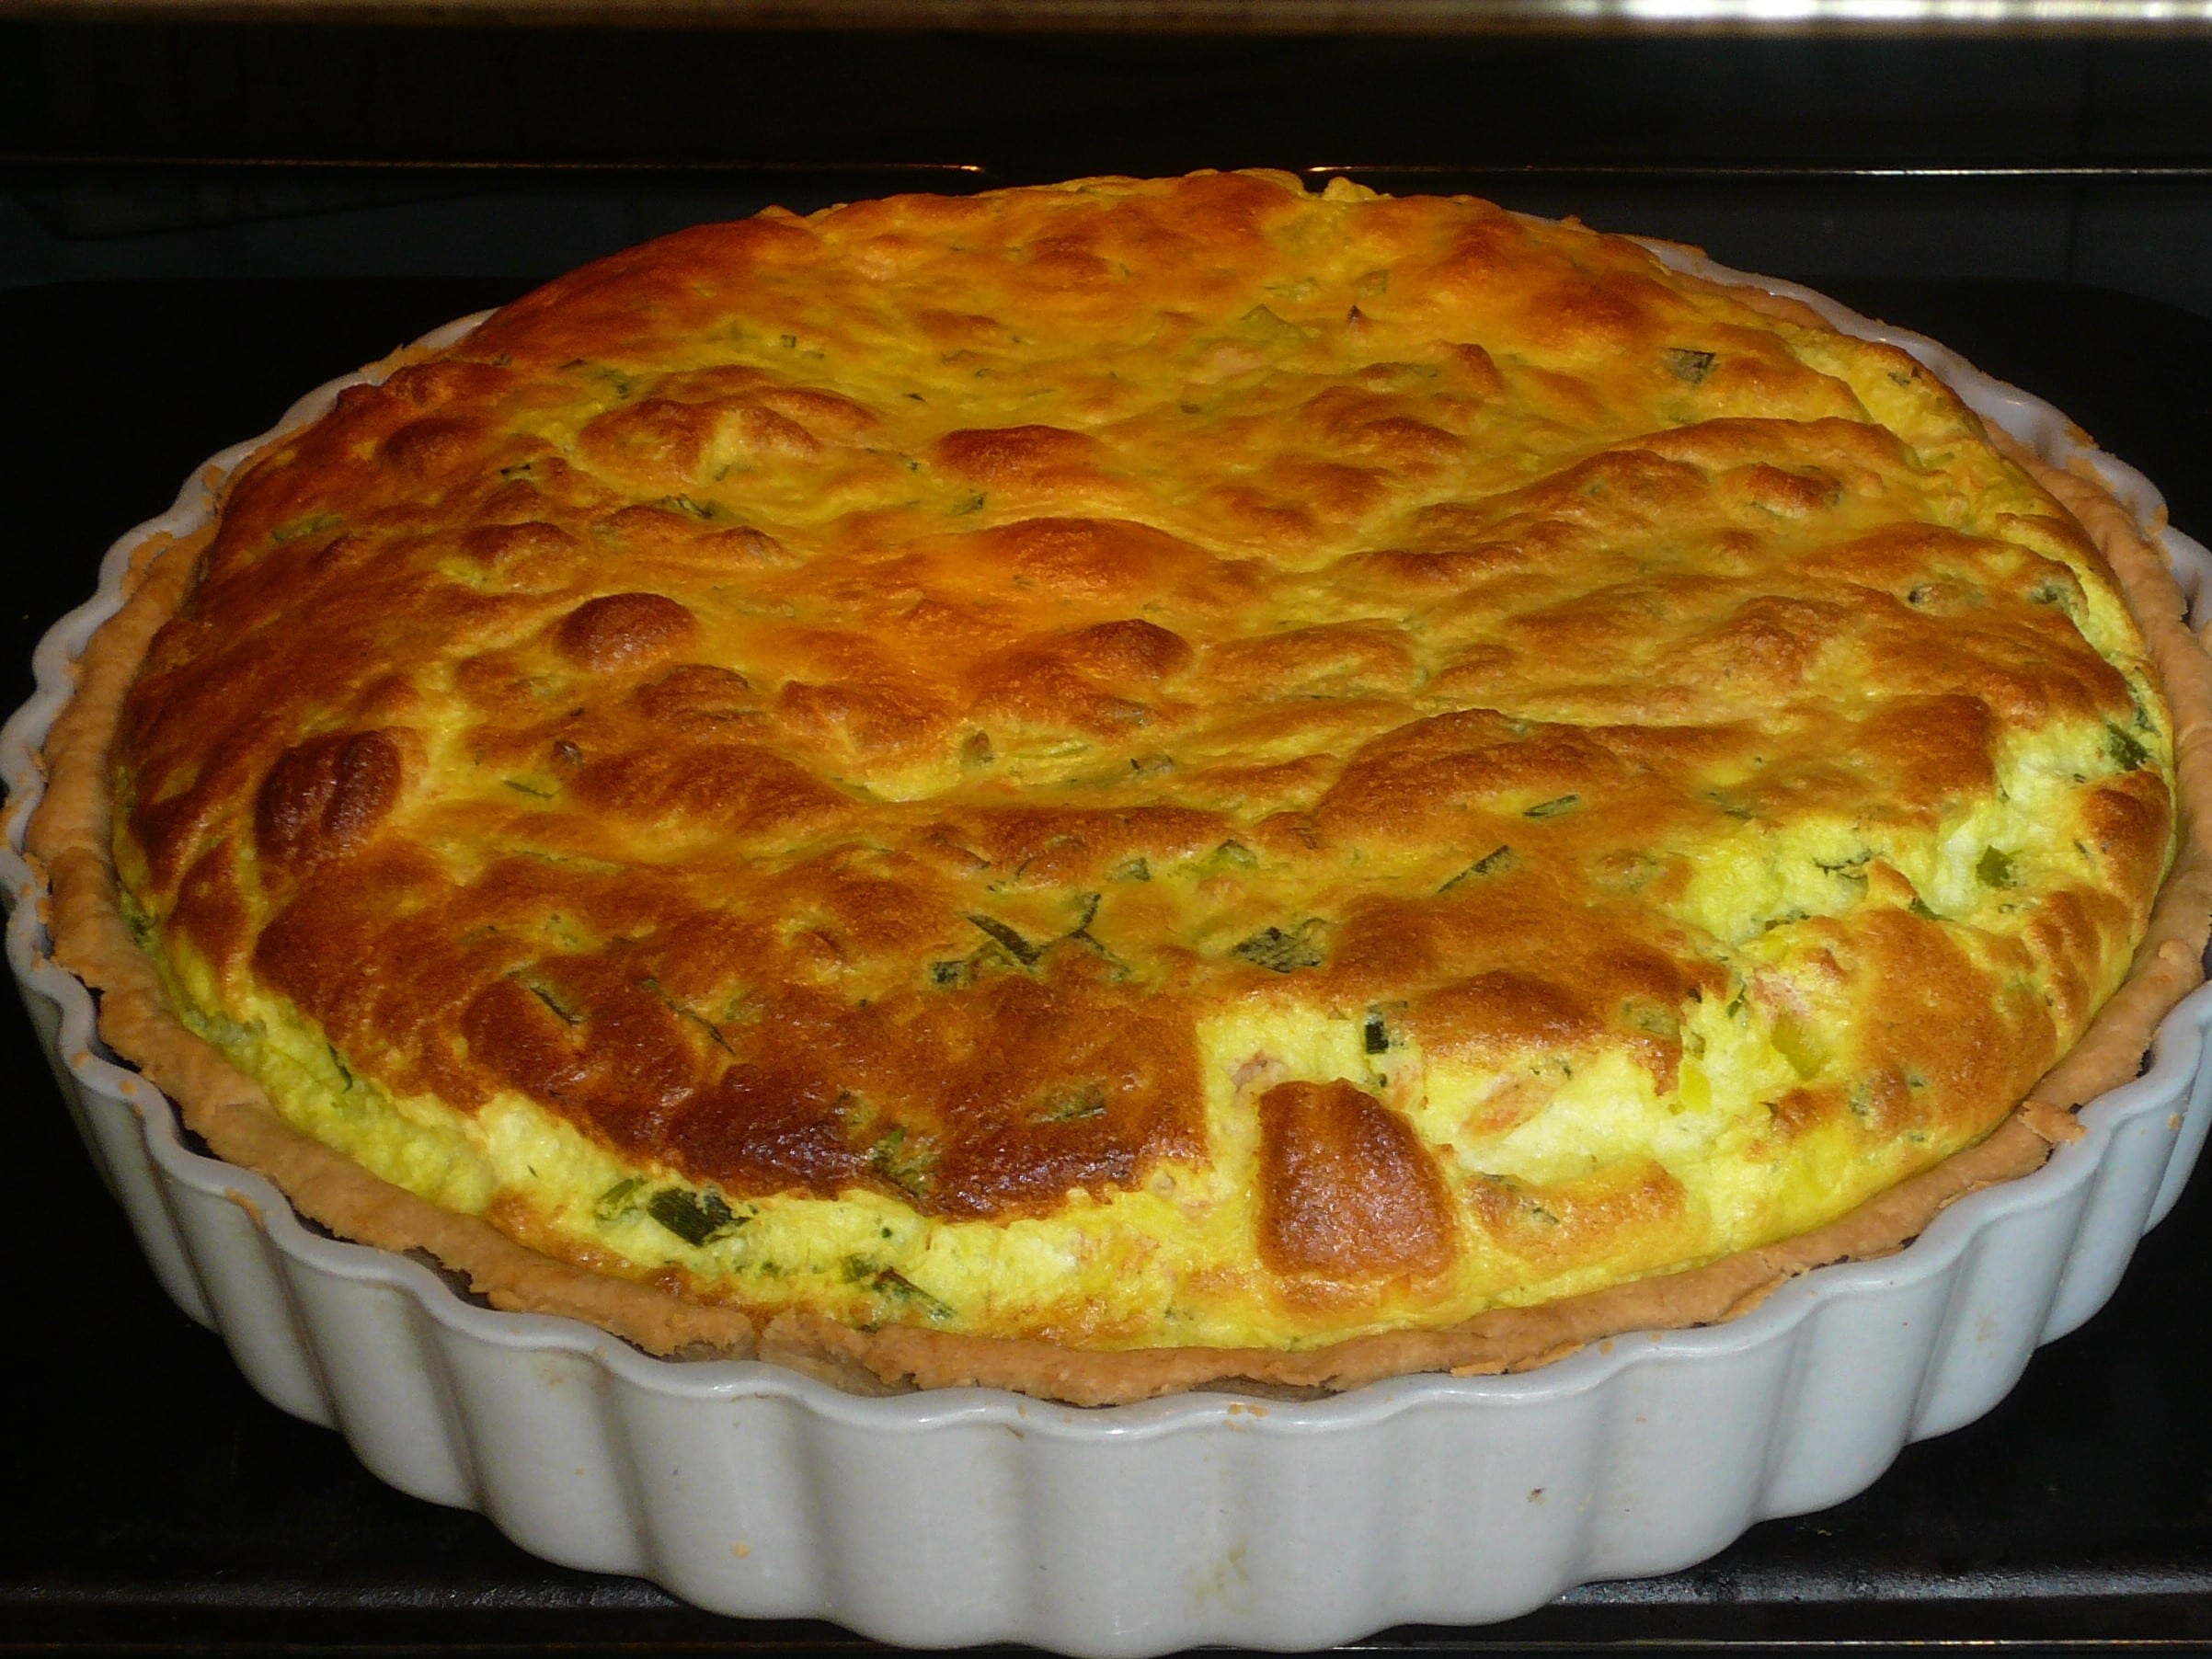
Leek Souffle Tart
This tart is more of a challenge, but great if your pastry case has a few cracks.

Lemon Meringue Pie
When was the last time you had a piece of Lemon Meringue??

Apple and Blackcurrant Pie
Try the Sweet Pie Pastry here, it can be delicate to handle, but results always look better once they’re cooked!